Windows 8 enable autorun (for real)

I recently had an awful time configuring my system to auto-run files from a USB drive. Problem was, no matter how many settings I changed, my executable just wouldn’t auto launch off my USB drive upon connecting the drive to my PC.

I tried the usual ‘AutoPlay’ settings from the control panel and checked the “Use AutoPlay for all media and devices” –

Use AutoPlay

The above didn’t work and I still kept getting the ‘What action would you like to take’ popup. I also tried changing the “Software and games” section to “Install or run program from your media” –

AutoPlay2

The above didn’t work either. This was both frustrating and confusing. Here I was using the control panel and selecting the right options but nothing seemed to work. I started scouring through some forums and realised that a lot of other people were facing issues with Windows 8 auto-runs as well. As a side note, I noticed that Windows 7 and below had absolutely no problem running an executable off a USB drive via auto-run. I was starting to believe this was some sort of ploy by Microsoft to secure Windows and prevent infections / malware that targeted auto-run.

After some more digging, I came across this article –

https://support.microsoft.com/en-us/kb/2328787

just for kicks, I fired up the Group Policy Editor (gpedit.msc) and changed “Turn off Autoplay” under “Autoplay Policies” to disabled. Voila! It worked!

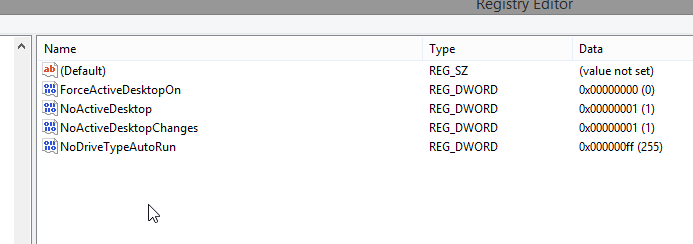
Then I noticed on my friends computer he did not have gpedit.msc as he was using the Home Premium edition of Windows 8. For operating systems that do not include Gpedit.msc and for an optional resolution, you can directly check and change the NoDriveTypeAutoRun entry value in the following registry key other than 0xFF.

HKEY_LOCAL_MACHINE\Software\Microsoft\Windows\CurrentVersion\Polices\Explorer\
HKEY_CURRENT_USER\Software\Microsoft\Windows\CurrentVersion\Policies\Explorer\

AutoPlay3

The Kick: Trying this on another friends PC, I noticed the control panel steps mentioned above worked! No registry editing required. The only difference between the two PCs? He ran Windows 8 while I ran Windows 8.1. I have concluded that this is some sort of bug or a step taken on purpose to keep auto-run disabled by default by Microsoft. If it is that, I think its a bit unfair to assume that nobody will want to auto launch files from their drives upon connection. I tested on another Windows 8 machine and it worked fine on that one too. Windows 8.1 is where this problem lies!

Get a free Microsoft SDK / Intel Galileo board

Microsoft are having an interesting promotion at the Windows on Devices web page.

They are asking you to sign up and provide details such as the languages you work on and any other hobby boards you may have worked on previously (Raspberry Pi, Beagle Board etc.). Fill in the details and MS will get back to you with another email asking you to provide your shipping address.

I haven’t received mine yet but I found a picture of what the kit could possibly look like –

Intel Galileo Kit

Intel Galileo Kit


Head on over to https://www.windowsondevices.com/ to get one for yourself 🙂

Enabling the status bar / line number indicator for Notepad in Windows

Notepad is one of the most commonly used application in Windows. Recently I was doing some code reviews and since Notepad wasn’t showing me line numbers, I had to load up another bulky editor which was a real pain.

In order to enable line number indication and to enable the status bar in Notepad, we need to do some simple registry editing –

1. Start the registry editor (Start > Run, type regedit.exe and press enter)

2. Goto the HKEY_CURRENT_USER\Software\Microsoft\Notepad section

3. For the “StatusBar” key, change the REG_DWORD value to 1 (Double click, type “1”, Click OK)

Close the registry editor, and your Notepad should now be able to display the status bar along with the line/column count. Pretty cool.

Notepad - Status-bar enabled

If editing the registry seems like a scary proposition to you, click here to download a registry script. Run it by double clicking.

Related articles, courtesy of Zemanta:

Visual C++ intermediate files / folders cleaner

If you like me find it extremely frustrating   to manually clean intermediate files generated by Visual Studio while compiling projects, this is a great solution.

Visual C++ Cleaner is a small script written by me entirely in VBScript that automates the cleaning of intermediate files that are normally created when we compile Visual C++ projects.

Its features are –

  • Clean the entire folder (with subdirectories) by entering only the path
  • Clean by extension
  • Clean by folder name (Debug, Release etc.)
  • Built in logging support
    Current extensions which are cleaned –

pch,clw,aps,plg,opt,ncb,scc,ilk,htm,vss,pcx,bkp,bak,bsc,user,suo

Current folders which are cleaned –

    debug, release

    This script is extremely flexible and can be used even for system maintenance by making a small change to the script. You can include any extensions which you want cleaned from your system and the script will take care of the rest. This script is also a great way to learn the basics of the VBScript language.

    I’ve even created a small user manual if you are finding it difficult to use the script

Visual Studio – amazing macros

visualstudio_logo Typing repetitive text or executing repetitive commands can be a real chore while coding. One often overlooked feature of Visual Studio is macros.

For example, I found myself continuously typing my name and the date as a comment for every small change that I made to code I was reviewing code. This helped my team working at another location to see the changes I had made. Visual Studio macros to the rescue! I wrote a simple macro which helped me save some time (and frustration) –

Sub test()
        Dim dtCurrDate As Date
        dtCurrDate = Now
        DTE.ActiveDocument.Selection.Text = "//Karan " + dtCurrDate.ToString()
End Sub

The output of the above macro will be //Karan 9/6/2010 11:06:47 PM. This is a great way to insert comments at the places where you make changes to code. The inserted time provides even more accuracy to the reader.

Some more examples of macros are –

Sub Cleaner()
        DTE.ExecuteCommand("Build.BatchBuild")
        DTE.ExecuteCommand("Build.RebuildSolution")
End Sub

What the above macro does is clean your current solution ( delete intermediate files ) and then rebuilds the solution.

Sub ifdefOut()
        PoundDefOut(False)
End Sub

The above macro can be used to #ifdef / #endif out a section of code.

An easy way to create your macro if you don’t know how to write code in basic is to use the built in macro recorder. Use “Ctrl+Shift+R” to record your macro and “Ctrl+Shift+P” to play the macro back. If you want to save this macro then you can go to Tools –> Macros –> Save Macro. This will save the macro to a file and can be viewed using the Macro Explorer (View –> Other Windows –> Macro explorer).

If you are comfortable with coding in basic, then the best way is to create your own macros is to launch the Macro Editor (Tools –> Macros –> Macros IDE) or Alt+F11, then type your macro.

Another great idea is to assign your macro a shortcut, so that you can invoke your macro without digging through menus. To assign macro shortcuts, go to Tools –> Options. From the Dialog that launches go to Environment –> Keyboard and set your shortcut.

The above macros are really simple macros. Visual Studio 2008 comes with many pre-installed macros. Right click –> edit these to view their source code so that you learn from these great examples.

The above macros have been tested on Visual Studio 2008 but the basic idea should work for other versions as well. Let me know in the comments if you know or would like to share some of your own macros.