Turn off notifications for specific apps on Android

Android Kitkat

Android Kitkat

Android allows you to turn off notifications for specific apps. However, the way to do this is not very obvious. I have an account on Flickr, however, did not want to continuously receive notifications on photos I commented on!

To turn off notifications, goto –

Settings -> Apps -> Select App -> Uncheck Show Notifications

Its a bit cumbersome but gets the job done. I’m not sure if this affects battery life in any way but if you aren’t being notified all the time, I’m guessing it saves you battery.

Display profile picture in Google search by adding Author Code to your blog – the easy way!

The process for getting your links to show up in Google search with your profile picture at the side as shown below is not an easy –

After multiple tries using different types of methods I finally found a simple and straighforward way to do this. It works great for WordPress blogs and theoretically should work the same way for Blogger as well.

  • Visit this badge generation link. Visit your Google+ profile page to get your Google+ Profile ID.
  • Select the “Icon” option button for the Type setting.
  • Once you have your Google badge code, right-click and copy it as shown below –

  • Under your WordPress dashboard, goto Appearance->Widgets. Add a text widget to your sidebar by dragging it onto the sidebar as shown below –

  • Add the Badge Author Code you had copied earlier and paste it into the Text Wwidget as shown below –

  • Click Save.

You’re all set! Give it a day or so let the Google Spiders crawl your website / blog for the changes. Once you are verified as the author of the blog, a link to your profile and your profile picture will begin appearing in Google Search results. It will make your blog posts look more professional! Note: Google likes high resolution profile pictures that are evenly sized. Make sure your profile picture set in Google+ is a decent image which has a resolution of atleast 250×250 pixels.

You can also use the official Google Rich Snippet Testing Tool to ensure your changes above are working.

Save brightness setting on reboot in Debian Squeeze / Wheezy

I recently installed Debian Wheezy (testing version of Debian 6) on my laptop. Most of the things went smoothly except for a few minor quirks. I eventually switched to XFCE desktop because I wasn’t too big a fan of the new Unity Gnome look.

XFCE was great for speed and it got everything I needed done really well. There was, however, one very annoying issue. Everytime I set my laptop brightness it was lost after a reboot. After reading up online and scouring forums, I finally found the location where the brightness setting is saved.

Location

/sys/class/backlight

There were multiple entries under this directory and changing one of them wasn’t enough for my case. Your case maybe different. To try out a setting before making it permanent, try the following command (as root)

echo 5 > /sys/class/backlight/acpi_video0/brightness

If the above command brings a change in your screen brightness, then you are on the right track. To save the brightness across reboots, we make a change to our /etc/rc.local file using the following commands as root –

cd /etc

gedit rc.local

Just above "exit" statement in the file, add the following lines –

echo 950 > /sys/class/backlight/intel_backlight/brightness

echo 5 > /sys/class/backlight/acpi_video0/brightness

echo 5 > /sys/class/backlight/acpi_video1/brightness

I added the above three lines as I had the entries acpi_video0, acpi_video1, and intel_backlight under my /sys/class/backlight folder. If you have different entries, then make appropriate substitutions above.

That’s it! Save the file and reboot. You should now have your brightness to the same level as you had left if before you rebooted.

.

Enabling the status bar / line number indicator for Notepad in Windows

Notepad is one of the most commonly used application in Windows. Recently I was doing some code reviews and since Notepad wasn’t showing me line numbers, I had to load up another bulky editor which was a real pain.

In order to enable line number indication and to enable the status bar in Notepad, we need to do some simple registry editing –

1. Start the registry editor (Start > Run, type regedit.exe and press enter)

2. Goto the HKEY_CURRENT_USER\Software\Microsoft\Notepad section

3. For the “StatusBar” key, change the REG_DWORD value to 1 (Double click, type “1”, Click OK)

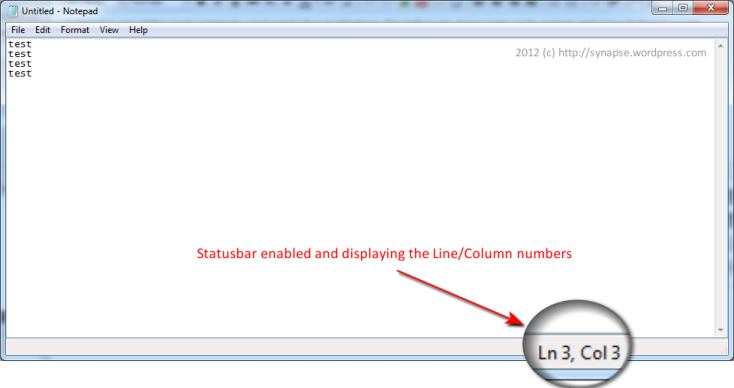
Close the registry editor, and your Notepad should now be able to display the status bar along with the line/column count. Pretty cool.

Notepad - Status-bar enabled

If editing the registry seems like a scary proposition to you, click here to download a registry script. Run it by double clicking.

Related articles, courtesy of Zemanta:

Top 5 Google Chrome extensions

Google Chrome extensionsLately I have ditched Firefox completely to adopt Google Chrome. The reason? Speed! Firefox crawls even on a fairly modern system when a javascript/flash filled  page is loaded. I am not saying Google Chrome is perfect but it it light as hell and the fastest browser on the planet as of now. Yes, it is faster than Opera.

The only reason why I completely switched to Chrome so late is because of poor Linux support and lack of extensions. All that has changed now and things are really beginning to heat up! The Linux and Mac versions are out of beta. What better time than now to write and article about my favorite Chrome extensions.

5. Adblock – Goto Adblock page

Adblock is a very nice extension to have. It is one of the most popular extensions for Firefox and is now available for Google Chrome. Block those pesky ads with support for whitelists, blacklists and filter lists. Another cool feature albeit in beta is the the ability to block ads in Youtube. I hate those pesky youtube ads. This extension runs in an unobtrusive manner so installing this extension is a no brainer.

4. StumbleUpon – Go to StumbleUpon page

StumbleUpon is known by almost every webjunkie out there. Find great webpages just by clicking the “Stumble!” button. StumbleUpon needs no introduction. If websurfing is your passion, then Stumble Upon should be in your arsenal.

3. Feedly – Goto Feedly page

Feedly organizes your favorite sources in a magazine-like start page. A very innovative way to read your RSS feeds in Google Reader. It feels like you have a fresh, well laid out magazine laid out in front of you each day. Trust me, once you read your feeds using Feedly, you will never go back.

2. ScribeFire – Goto ScribeFire page

ScribeFire is a full fledged blog poster/editor with support for the mainstream blog sites like blogger, wordpress etc. Installation and setup is a breeze and is fairly easy to get up and running. Give it a shot if you don’t want to install additional software on your machine or just want a quick and convenient way to post to your blog.

1. Chromed Bird (twitter) – Goto ChromedBird page

No top list is going to have twitter missing J This has got to be one of the nicest twitter clients out there. Just authorize the extension to access your twitter account and you are all set. Tweet, reply, retweet, direct reply all from a nice and easy to use interface. It’s not the best client out there but it is an extension and for that it does all you need.

Other honorable mentions –

Downloads, Facebook for Google Chrome, FlashBlock, LastPass

w.bloggar – Blog from your desktop!

I am not particularly fond of blogging from the default WordPress editor. It’s just a little slow for my taste (especially when the post is long) and also I hate firing up a browser window just to post a new article.

Say hello to w.bloggar! This cool application lets you blog right from your desktop. It is an application that acts as an interface between the user and one or more blog(s). Because w.bloggar runs over the Windows GUI, it allows the user to edit posts without being connected to the Internet. Perfect. Just what I was looking for.

Few popular blogging services supported by w.bloggar are Blogger, WordPress, Typepad, Upsaid, UBlog, Drupal, Livejournal etc. Setting up w.bloggar was a breeze. I just had to do a quick google search for finding my endpoing API for WordPress.

Following are the steps for setting up w.bloggar to use WordPress –

1. Select if you want to create a new account or already own an existing account –
Here I selected the first option since I already have an existing account on WordPress.

2. Setting up your blogging service –
Use this option to select your blogging service (eg: WordPress, Blogger etc.) The alias can be any easy to remember name for you to refer to this blog.

3. Account Connection Settings screen –
This is the most important screen. You need to tell w.bloggar where your blog is hosted and how w.bloggar can access it.

  • The first question is where is your blog hosted. Mine is – synapse.wordpress.com
  • If the blog was on my own Website, for instance http://www.synapse.com, the host would be http://www.synapse.com (without the http://)
  • Then it asks you for the full path to the API endpoint of your blog tool. Mine is /xmlrpc.php. If you have a blog on wordpress, yours will be the same. But, if your blog lives on your Website, for instance http://www.xyz.com/synapse, the path would then be /synapse/xmlrpc.php
  • The default port is set to 80, which you can leave or change for security by clicking the https button; this will change the port to 443.
  • The next page asks for your login details and you’re done.


Download w.bloggar from http://wbloggar.com/

Some similar tools for other operating systems –
* iBlog (MacOS) :: http://iblog.soapdog.org
* BlogApp (MacOS) :: http://www.objectivelabs.com/blogapp.php
* BlogGTK (Linux) :: http://blogtk.sourceforge.net/
* BlogniX (Linux) :: http://blognix.sourceforge.net/